How to wash and cook Sushi Rice
- Joe Kimura
- May 29, 2020
- 6 min read
Rice makes up at least 60% of sushi, so it's an important part to get right. It's also the part of sushi that most people don't understand or have the most difficulty with. With these simple steps, you'll be able to make delicious and perfectly textured sushi rice. The first thing to understand is that sushi rice is not boiled, but steamed. And the second thing, is that good quality Japanese rice is a thing of value, and you need to choose a good rice such as koshihikari or akita komachi in order to get the best results. Using cheap, non-Japanese varieties will never give you a good result, no matter how well you prepare it. Ask your local Asian store if you're not sure what to buy. Good food starts with good ingredients, and this is especially important with sushi, since at it's essence it's simply just fish and rice. This may look like a long recipe, but I have detailed every step to help you get the best result.

How to prepare Sushi Rice
Makes: about 18 pieces
Time to prepare: 35 minutes
Ingredients
400ml Japanese round rice (measured before washing)
400ml water
10ml cooking sake (optional)
Equipment
Large bowl
Fine sieve or strainer
Spatula or fork
Pot with a heavy base and tight-fitting lid
or
Rice cooker
How to wash rice
Why wash rice? Because Japanese rice contains much higher starch and protein than other varieties, it needs washing to remove the excess. The stickiness of rice (from the starch) is important to hold the cooked grains together so that they can be eaten with chopsticks, but if it’s too sticky it becomes chewy.
First measure the amount of rice you want to cook into a jug in millilitres. You will need about 100ml dry rice per person.
Place the rice in a large bowl and add a very small amount of cold water. If you add too much water at the start it will not create any friction.
Swish the grains of rice together with your hand, and gently rub the starch away. This is called ‘sharpening’ the rice in Japanese. (b) You want to rub the rice between your thumb and forefingers to create some friction, but do not press too hard or you will break the grains.
The water will turn a bright milky white. Pour this away and add more water, but again not too much. Keep rubbing the rice until the water is cloudy again.
Pour away the water and add fresh water again. This time add more water.
Repeat the process many times until the water runs completely clear, each time adding a bit more water. Be patient! This process takes at least 5 to 10 minutes, so don’t be tempted to stop when the water is still cloudy. This is the most important part of preparing rice, and makes a huge difference when you cook it.
Make sure the water is completely clear before you stop washing.

How to soak rice
Why soak rice? Once the rice has been washed, it needs to soak, so that it can absorb its own weight in water. This means the rice will cook evenly. Without soaking, you will end up with some grains of rice raw and some overcooked .
(a) Once the water runs clear, fill the bowl to cover the rice completely in cold water to twice the volume, and leave it to soak. If you pick up the rice in your hand (b), you will notice that some of the grains are grey and translucent, and others have white specks. This is because the rice turns white when it has absorbed water.
Leave the rice to soak. The time it takes depends on a few factors: how old the rice is, and what season you are in. See the explanation opposite about age if you are curious as to why. As a general rule it takes between 10 and 45 minutes, but you don’t need to watch the time. Instead, check the rice by picking it up every 10 minutes and looking to see if the grains have turned white.
You will know when it is ready as all the grains will have turned 100% white, with no grey spots (See picture).
As soon as they are all white, drain the rice in a strainer.

How to drain rice
Why drain rice? Once the rice has soaked and absorbed its weight in water, it’s important to leave it to drain, removing any excess water. If you don’t give it time to drain, you will have too much water in the pan and the rice will overcook.
Leave the drained, washed rice in the strainer over a bowl for a good 5 to 10 minutes so that the excess water can drain off.
Once the water has drained off, you can store the rice in a container in the fridge for a couple of days if you don’t need to cook it straight away.
How to cook rice
Japanese rice is ‘steamed’ in a pan with a lid, rather than boiled, so it’s always cooked with the same amount of water as rice.
Place the washed, soaked, and drained rice into a pan with a thick base and airtight lid, and spread it around evenly.
(a) Cover the rice with the water and sake (if using), and place the lid on (b).
Turn on the heat at full power and let it come to the boil, you should see steam start to escape from the lid. This will take about 3 to 4 minutes depending on your stove.
As soon as it has come to the boil, turn down the heat to the minimum, making sure the lid is still on tight. Leave it to cook for 10 minutes. Do not open the lid!
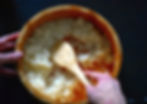
Once the 10 minutes is up, turn the heat back up to full power for 3 minutes. This is to caramelise the bottom of the rice. This is called ‘o-koge’ and tastes amazing.
Now turn off the heat and remove the pot from the heat source. Leave it to rest for 10 minutes, to let the remaining steam fall from the lid. Do not open yet.
Once the rice has rested, open the lid, and fluff up the rice using a fork or spatula. Enjoy hot!

How to mix sushi rice
To mix sushi rice, take 200ml of sushi vinegar for 1kg of cooked rice. Rice doubles in weight when cooked, so if you cook 250g raw rice, it will become 500g of cooked rice, meaning you need to use 100ml of sushi vinegar.
Method
Soak a wooden handai in cold water for 30 minutes before you use it. This is to stop the wood absorbing too much moisture, and also stop the rice from sticking. Put the rice vinegar into a jug so it’s ready to use.
Make sure the rice has rested for 10 to 15 minutes after cooking before you mix it. If the rice is too hot it will absorb too much vinegar, and if it’s too cold it will not absorb enough. So the best time is ten to fifteen minutes after cooking.
Fluff up the rice in the pan using the spatula. Then scoop the rice into the wooden handai or wide bowl. If you have cooked the rice in a pan, and have ‘o-koge’ on the bottom, don’t put that into the sushi rice.
Spread the rice out with the spatula using a flicking movement. Then bring it all together to one side. Now spread it out again, and bring it back together a few times. This is to cool down the rice before you add the vinegar. It should be just over body temperature, about 40°C.
As you are spreading and grouping the rice together, use the corner of your spatula to ‘flick’ the clumps of rice, to separate the grains. It’s important that there are no lumps of rice stuck together before you add the vinegar, as otherwise the rice will not be seasoned properly.
Once you are satisfied with the cooling and spreading, spread the rice out all over the bottom of the bowl.
Hold the spatula flat over the rice, and flick it from left to right with your wrist. With your other hand, pour the vinegar very slowly onto the spatula. The vinegar should hit the spatula and then be spread out evenly. If you pour the vinegar directly on the rice, you will get a sloppy mess that’s hard to mix.
Once the vinegar is added, repeat the spreading and collecting movement with the spatula, and make sure the grains of rice are evenly separated and coated with the vinegar.
When you have mixed it all around, the rice will become shiny. Gather the rice into one corner, and place a warm damp cloth over the top. This is to keep it warm while you work.
Now the rice is ready to make sushi.